

The COVID-19 outbreak has forced many businesses to become familiar with online meetings – fast!
This will be a new way of doing business for a lot of people, but it is really quite simple. Zoom is a very straightforward video conferencing software that is easy to set-up and effective for running online meetings.
With the sudden surge in people working from home, we thought it would be useful to provide a user-guide that will take you through the process of setting up your Zoom account, right through to hosting the meeting and how to get the most out of your video conferencing setup.
Registering for an account
It’s really quick and easy to signup for a Zoom account: simply enter your work email address, then ‘Activate account’ by clicking the link in the registration email that Zoom will send you.
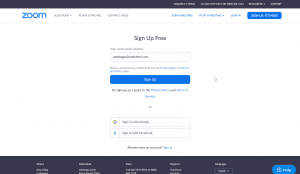
The link from the registration email will take you to your main account set up. Enter your first and last name and create your password, then hit continue.

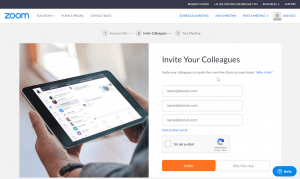
Zoom then asks you if you want to invite colleagues to create their own free accounts. Whilst you can invite anyone to your meetings and they don’t need an account, if others also have a free Zoom account then you can start meetings more instantly.
Testing computer audio/microphone setup
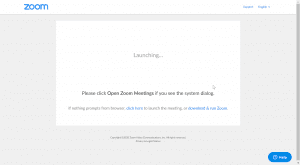
The next stage of setup allows you to try a test meeting. This is where you will see ‘Download & run Zoom’. If you haven’t done so already, then go ahead and download the Zoom software.
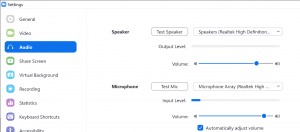
The test meeting is useful in allowing you to test your computer audio and make sure your microphone is setup. Once you have downloaded the software and signed in using your new account details, you can simply go click ‘Test computer audio’ if you are trying out a test meeting, or you can simply go to ‘Settings’ at any stage. When you start any meeting, you will always be given the option to ‘test microphone’ and audio. You can use an external mic or sync the meeting with your computer audio.
Setting up your first meeting
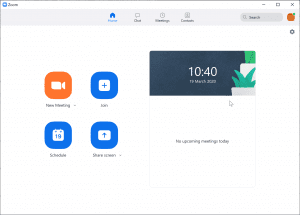
Now it’s time for you to setup your first, real meeting. Start up your Zoom app and sign into your account. Then select ‘New meeting’.
Connect and test your audio, and make sure you have wiped your camera so that it is clean and smudge-free and you can be seen clearly before you start your meeting.
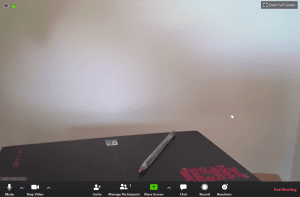
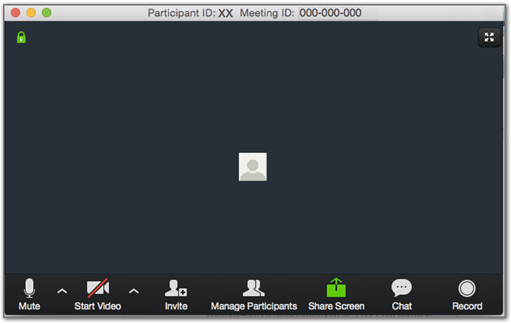
When you are in a video meeting, you are able to ‘Mute’ your audio so that you cannot be heard, and you can ‘Stop Video’ so that your camera turns off and you cannot be seen. These can then easily be turned back on whenever you wish. You can also record the meeting by hitting ‘Record’, and you can react live by choosing the ‘thumbs up’ or ‘hands clapping’ options in ‘Reactions’.
Sending invites
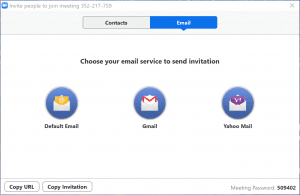
You can easily invite contacts to join your meeting. From your video conference, click ‘Invite’. You can then invite either by ‘Contacts’ (those who already have a Zoom account) or by email, either default email, gmail or yahoo mail. You can also copy the URL or the email invitation for the meeting and send it to whoever you want to invite to join – for example you can copy the URL and post it across social media.
Keep in mind that if you have parental controls installed on your computer, this can block your connection to meetings, and so these may have to be temporarily switched off.
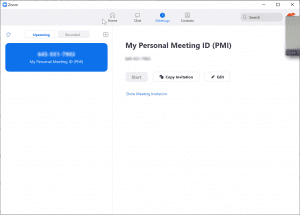
Optional meeting password
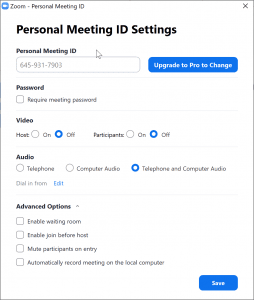
There is an optional meeting password that can be sent with invitations to allow access to the meeting. You can turn this off or edit this password if you navigate to ‘Meetings’ in your Zoom homescreen area, then find the relevant meeting and click Edit. Under personal meeting ID settings, you can edit the password.
Personal meeting id v.s. system automated
You can customize the digits of the personal meeting ID if you are using the paid plan alongside pro license. If you want to use your Zoom Personal Meeting ID to schedule meetings so that members can attend, make sure your PMI is unchecked. If any of the participants has the link to your PMI then they can access and join the meeting at any given time. Participants will however be locked out of the meeting if you decide so or make use of ‘Waiting Room’ feature to get mandate of admitting users individually.
Screen sharing
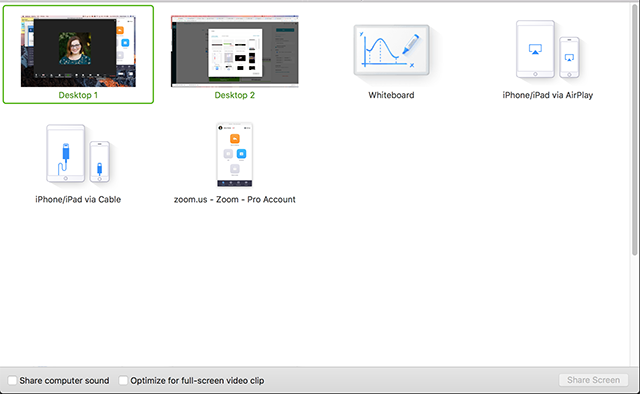
When in your meeting, you can choose ‘Share screen’ to allow all parties to view shared documents together. You can share the web page that you currently have opened and you can even share documents from OneDrive, Dropbox, Google Drive or Box so that everyone in the meeting can collaborate on different pieces of documentation together.
Muting and unmuting participants microphones
As the host of the video conference, you can mute and unmute participants microphones quickly and easily. All you have to do is click ‘Manage participants’ and from the list that appears on the right hand side, select the participant you would like to ‘Mute’ or ‘Unmute’. You can also ‘Mute All’ or ‘Unmute All.’

The in-meeting messaging system
By selecting ‘Chat’, you can communicate by typing messages and sending files. You have the option to allow participants to only be able to chat to you (the host) or to everyone, and you can send messages to individual participants.
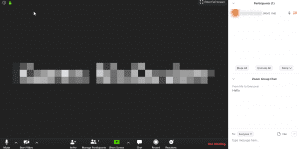
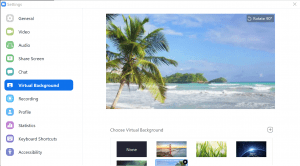
Setting a ‘Virtual Background’
Another brilliant feature to Zoom is the ‘Virtual backgrounds’ option. These allow for privacy in your home environment. Click the upwards arrow beside ‘Stop Video’, and select ‘Choose Virtual Background’. There are multiple backgrounds to choose from, and they can be downloaded in less than a minute.
Limitations of the free version of Zoom
The free version of Zoom is great – it allows you to host and join important video conferences, chat, share files and collaborate as a team. However, there are some limitations of the free version. With a Zoom Basic service, whilst you can host unlimited meetings and you have unlimited minutes for one-to-one meetings, if you have a group of 3 to 100 video participants, your meeting will cut out after 40 minutes.
With Zoom Pro there are some other added features – you can assign a ‘Scheduler’ so that someone can organise and schedule meetings for you, you can customise your Personal Meeting ID and you can access Reporting features that will provide daily usage reports on your account, including reports on new users, meetings, participants and meeting minutes.
Other online communication/collaboration tools
There are some other great free tools out there that can allow for highly productive remote working and maintain strong communication and collaboration outside of the workplace. These include:
- Slack – This is a really useful ‘chat room’ for internal communication within your company. Slack’s workspaces allow you to organize communications by channels for group discussions and allows for private messages to share information, files, and more all in one place.
- WeTransfer – This is a cloud-based online platform designed to allow you to transfer very large files for free to other users online, quickly and easily.
- Dropbox – A file hosting service that allows you to bring your files and cloud content together in one workspace so that your team can access work from anywhere and at any time.
So, whilst remote working may be completely new to you and your business, these extremely useful and easy to use tools will allow you to communicate and connect with your team online. Now that you know how to use Zoom, you should familiarise yourself with these other tools and learn how to make the most out of them too.
This means that if you have to ‘work from home’, you and your team are able to maintain collaboration and communication, not only using Zoom for online meetings but also using Slack for instant communication or Dropbox for sharing content. This way, you can reduce the disruption to business activity and stay productive and motivated as a team throughout any crisis.


